What Is the Total Finished Height of a Stacked Front-Load Washer and Dryer?
Determining the total finished height of a stacked front-load washer and dryer is a critical step in planning your utility space. Whether you are fitting a unit into a tight hallway closet or renovating a dedicated laundry room, knowing these dimensions prevents expensive installation errors. Most homeowners are surprised to find that the combined height can vary significantly based on the specific models and the type of mounting hardware used.
By understanding how to measure your space and account for necessary clearances, you can ensure your laundry setup fits perfectly. This information helps you avoid the frustration of appliances that are just an inch too tall to slide into their designated cabinets.
Standard Height Ranges for Stacked Laundry Units
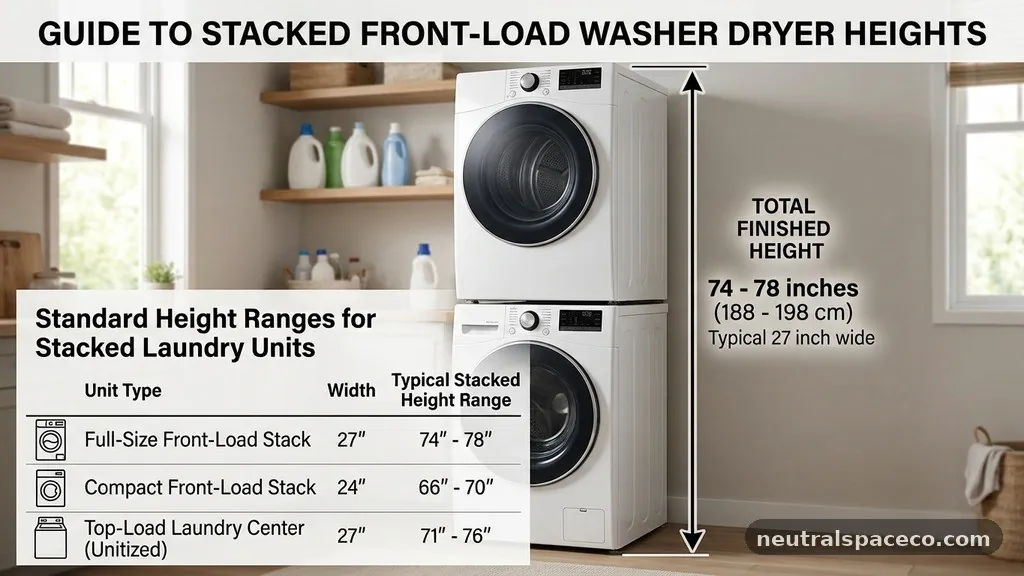
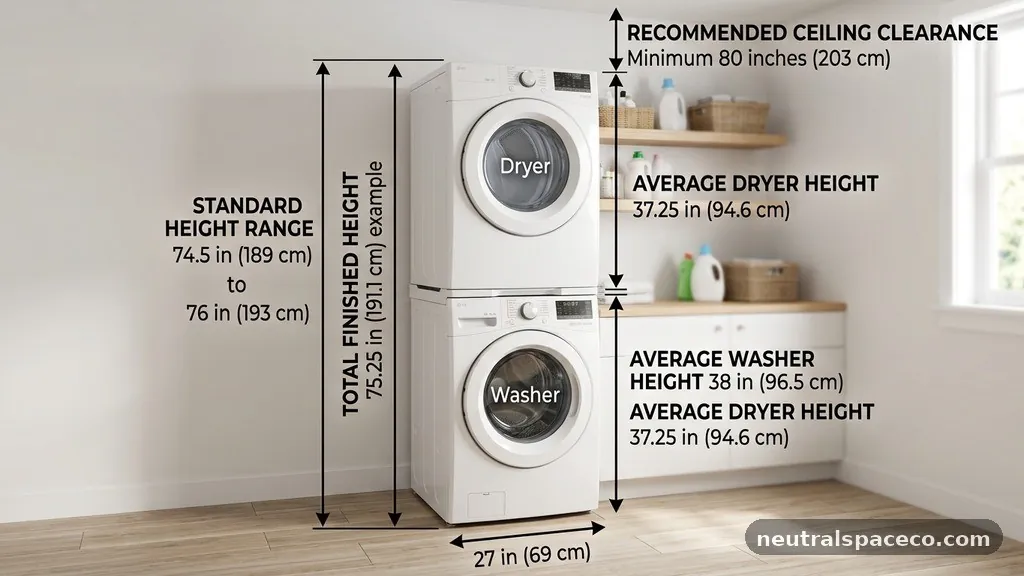
When asking what is the total finished height of a stacked front-load washer and dryer, the most common answer falls between 75 and 80 inches. Most standard-sized front-load washers stand about 38 to 40 inches tall, and their matching dryers are generally similar in height. When you stack them, you are effectively doubling that base height, though the stacking kit itself adds a negligible amount of space.
You should always consult the specific manufacturer specifications for your chosen models before purchasing. Relying on general averages can lead to mistakes if you select a high-capacity model that is taller than the entry-level compact versions.
Many compact laundry units are designed specifically for apartments or small homes, often measuring closer to 70 inches in total height. These units prioritize space efficiency over the massive drum sizes found in full-sized counterparts. Conversely, high-capacity, luxury-tier front-load washers often feature taller profiles to accommodate larger door openings and internal components.
If you are working with a pre-existing laundry closet, these few inches of difference can determine whether or not your bifold doors will close properly. Always measure from the floor to the very top of the dryer’s control panel, as this is the highest point of the stack.
The Role of the Stacking Kit
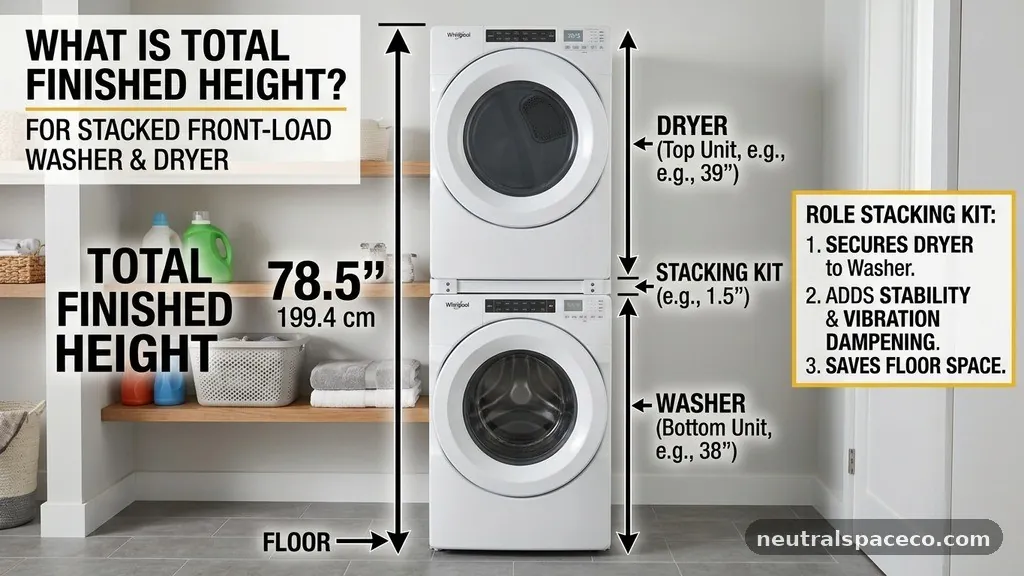
A stacking kit is a mandatory component for safely securing an electric or gas dryer on top of a front-load washer. Beyond just providing stability, these kits often account for a small fraction of an inch in the total height calculation. The kit acts as a bridge, transferring the weight of the dryer directly to the frame of the washer rather than the vibrating top panel.
Most kits include brackets and screws that lock the two machines together, preventing the dryer from shifting during heavy-duty spin cycles. You must use the specific kit recommended by the manufacturer to ensure the warranty remains valid.
Some modern stacking kits include a built-in pull-out shelf, which provides a convenient surface for folding clothes or resting laundry baskets. While this is an excellent ergonomic feature, it can sometimes add an extra inch or two to the total profile of the unit. If your vertical clearance is extremely tight, check if the stacking kit requires this additional space or if it sits flush between the units.
Always verify the installation manual to see if the kit modifies the footprint or height requirements of the stack. Proper installation of this hardware is non-negotiable for both safety and legal compliance.
Calculating Vertical Clearance Requirements
Knowing the total height of the machines is only half the battle when preparing for appliance installation. You must also account for essential vertical clearance to ensure the units function correctly and can be serviced. Most installers recommend leaving at least 1 to 2 inches of space above the top of the dryer for ventilation and ease of access.
Without this gap, you may find it impossible to reach the back of the machine if you need to disconnect the vent ducting or check a plumbing hookup. Heat buildup is a real concern for dryers, and restricting airflow can lead to inefficient drying or even fire hazards.
Consider the location of your electrical outlet and water supply lines when calculating your total space. If these utilities are located directly behind the stack, they might push the appliances forward, potentially interfering with your closet door clearance. You should also account for the thickness of the vent ducting, which often requires a few inches of depth behind the dryer.
If you are placing these units in a recessed closet, the depth and height work in tandem to define the usable space. Use a measuring tape to verify the distance from the floor to the lowest hanging shelf or light fixture in your laundry area.
Impact of Pedestal Bases
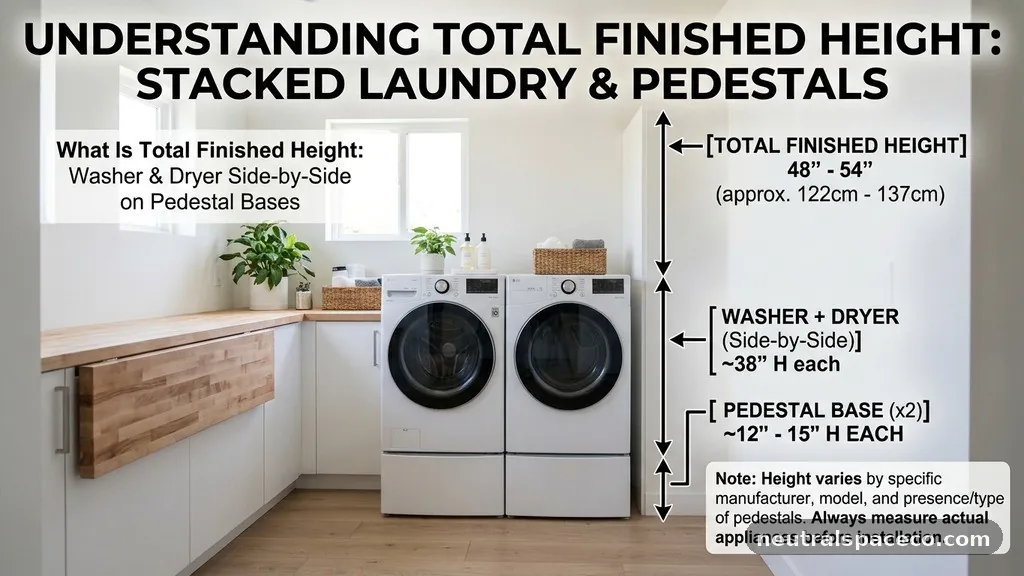
Some homeowners choose to place their washer on a pedestal base to raise the door to a more comfortable height. However, adding a pedestal to the bottom of a stackable configuration is generally not recommended or even possible for most brands. Pedestals are designed to support the weight of a single machine and are not engineered to handle the combined weight of a stacked dryer.
If you require a higher door height, you might look for integrated laundry solutions that offer elevated configurations from the factory. Attempting to modify a standard stack to include a base can compromise the structural integrity of the entire setup.
If you are concerned about bending over to load and unload, look for units with larger-than-average door diameters. Many manufacturers have shifted their design language to include higher-set doors, which mitigates the need for a pedestal base. These ergonomic improvements provide a similar benefit without the risk of an unstable, custom-built riser.
When comparing models, check the distance from the floor to the bottom of the door opening. This measurement is often more important for your daily comfort than the total finished height of the stack itself.
Comparing Dimensions Across Common Models
To give you a clearer picture of how these dimensions compare, the following table outlines the approximate height ranges for different categories of stackable laundry appliances. Note that these figures are estimates and can vary by brand and specific model year. Always refer to the official Energy Star product database for exact technical specifications before finalizing your purchase.
| Appliance Type | Single Unit Height | Stacked Total Height |
|---|---|---|
| Compact 24-inch Units | 33–35 inches | 67–71 inches |
| Standard Full-Size Units | 38–40 inches | 76–81 inches |
| Ultra-Capacity Models | 40–43 inches | 81–87 inches |
These figures demonstrate that not all stackable units are created equal. The 24-inch compact units are specifically engineered for small footprints, often found in urban apartments or retrofitted closets. Conversely, the ultra-capacity models are designed for larger utility rooms where height is not a limiting factor.
If your space is restricted, prioritize the compact segment to ensure you have enough room for the necessary clearance. Never assume that a “standard” stack will fit into any given closet space without first confirming the dimensions of the specific model.
Structural Framing and Floor Loads
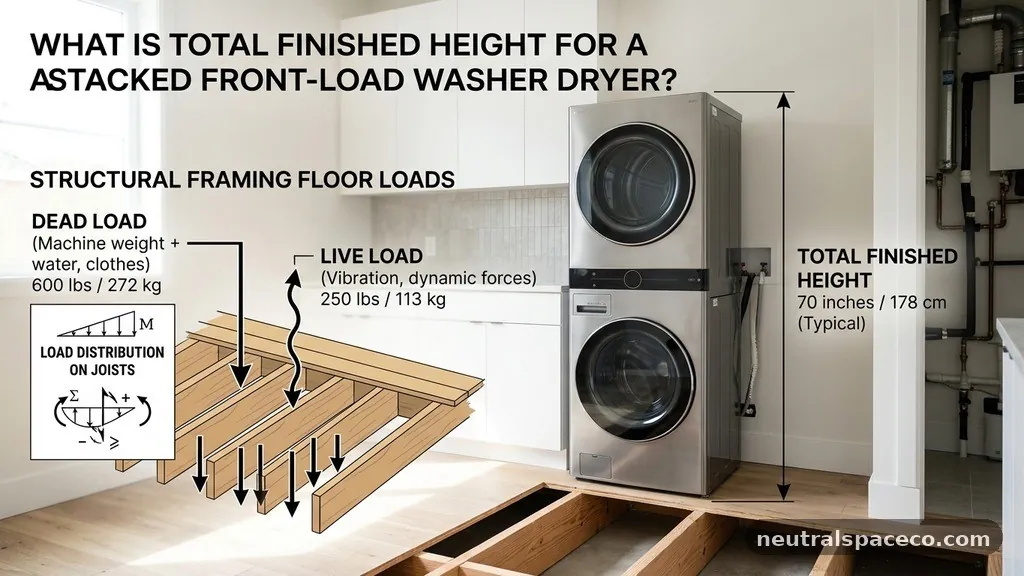
When stacking a heavy-duty front-load washer and dryer, the total weight of the units becomes a significant factor for your flooring. A full-sized washer filled with wet clothes can weigh several hundred pounds, and adding a dryer on top increases the concentrated load on your subfloor. Ensure that your laundry room floor is level and capable of supporting this weight without flexing.
If you are installing these on an upper floor, check with a contractor to ensure the structural framing can handle the vibration and weight. Most modern residential floors are built to code, but older homes may require additional reinforcement.
Vibration dampening is also a critical component of a successful installation. As the washer spins at high speeds, it generates significant kinetic energy that can travel through the floor and into the walls. Installing high-quality leveling feet and rubber anti-vibration pads can help isolate this movement.
Ensure that the stacking bracket is tightened to the manufacturer’s torque specifications to prevent the dryer from rattling against the washer. A stable, level foundation not only protects your floor but also extends the lifespan of the appliance motors and internal components.
Accounting for Vent Ducting and Utilities
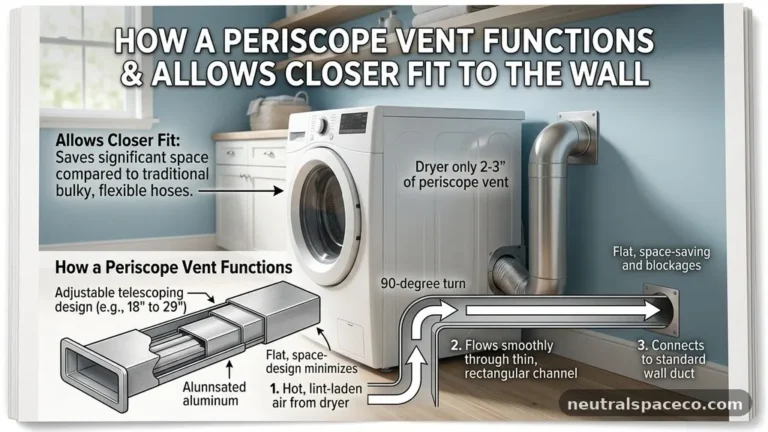
The vent ducting is often the most overlooked aspect of calculating the total finished height and depth of your laundry stack. A dryer requires a clear path for exhaust, and the ducting must be routed properly to prevent lint accumulation. If the duct exits the top of the machine or requires a sharp turn, it may interfere with the available vertical space.
Use rigid or semi-rigid metal ducting rather than flexible foil hoses to ensure smooth airflow and reduced fire risk. Always check if your specific dryer model supports side or bottom venting, which might save you precious vertical space.
Electrical and plumbing hookups must also be placed strategically to avoid blocking the units. For a stackable setup, the outlet and water valves are typically positioned to the side of the unit to ensure they remain accessible. If they must be located behind the stack, ensure they are recessed into the wall to keep the appliances as close to the back wall as possible.
This extra depth is crucial if you are trying to fit the stack behind bifold or sliding doors. Proper planning of your utility room layout will save you from having to pull the heavy stack away from the wall for maintenance.
Laundry Room Ergonomics and Access
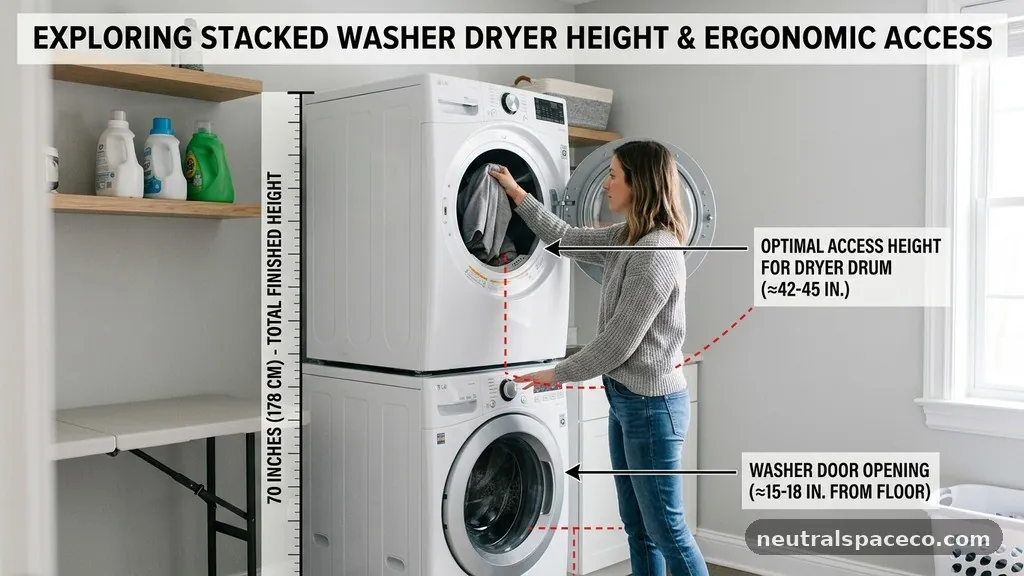
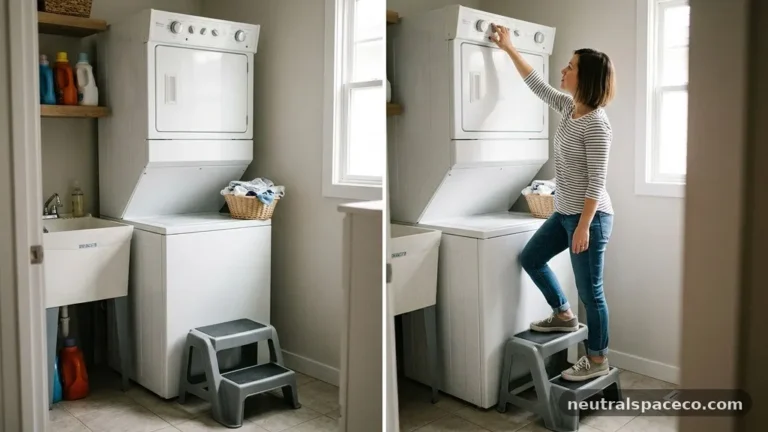
When you stack your appliances, you are moving the controls of the dryer to the top of the unit, which can be difficult for some users. Consider the height of the control panel when planning your installation, as you want the buttons to be reachable without a step stool. If the controls are mounted on the back of the dryer’s top panel, it can be nearly impossible to see them if you are shorter than five feet.
Some high-end models offer remote control functionality via smartphone apps, which can be a lifesaver in this scenario. Evaluate your own reach and comfort level before committing to a specific stackable configuration.
The door swing is another ergonomic factor that affects how you interact with the machines. Ensure that the doors open wide enough to allow for easy transfer of laundry from the washer to the dryer. If you are in a tight corner, consider swapping the door hinges if the model allows it.
This simple adjustment can make the difference between a seamless laundry experience and a daily frustration. Always leave enough floor space in front of the units to stand comfortably while loading and unloading without feeling cramped.
Common Installation Mistakes to Avoid
Many DIYers fail to account for the thickness of the flooring or the trim when measuring for their laundry units. If you have thick carpeting or a raised threshold, this can add height that you didn’t account for in your initial measurements. Always measure from the finished floor surface, not the subfloor, to get an accurate reading.
Another common mistake is failing to account for the thickness of the wall trim or baseboards. These small details can push your unit out by a quarter-inch, which is sometimes all it takes to prevent the door from closing.
Improper leveling is another frequent issue that leads to excessive vibration and premature wear. Use a spirit level to ensure the washer is perfectly flat in both directions before you even think about installing the dryer. If the floor is slightly uneven, use the adjustable leveling feet to compensate for the slope.
Never use makeshift shims made of cardboard or wood, as these will compress over time and cause the unit to become unlevel. Take the time to do it right during the initial setup, and you will avoid years of noisy, inefficient laundry cycles.
Frequently Asked Questions
Is it possible to stack any front-load washer and dryer?
No, you cannot stack just any pair of machines. You must use a matching set from the same manufacturer and ensure that both units are explicitly listed as “stackable” in their technical specifications. Mixing brands or using a non-compatible dryer will lead to an unstable, dangerous configuration.
Do I really need a stacking kit?
Yes, a stacking kit is essential for safety. It secures the dryer to the washer, preventing it from sliding off during the high-speed spin cycle. Without a kit, the vibration will inevitably cause the top unit to shift, which poses a significant risk of damage or injury.
How much space should I leave for ventilation?
You should generally aim for at least 1 to 2 inches of clearance on the sides and top of the unit. This space is necessary for heat dissipation and to prevent the appliances from vibrating against the walls. Always check your specific owner’s manual for the manufacturer’s recommended clearance distances.
Can I install a laundry stack inside a small closet?
Yes, but you must ensure the closet has adequate ventilation to prevent moisture and heat buildup. You should also verify that the closet door allows for enough clearance so that the appliance doors can open fully. If the space is very tight, consider using slim-profile or compact laundry units.
What happens if my unit is too tall for my space?
If your stack is slightly too tall, you may need to remove the top shelf of your closet or consider a different model with a lower profile. Never attempt to force a unit into a space where it does not fit, as you will likely damage the machine or the surrounding cabinetry.
Summary of Considerations
The total finished height of a stacked front-load washer and dryer is a major factor in home design and appliance selection. By focusing on the 75- to 80-inch average range and carefully checking the specifications for your chosen models, you can avoid costly errors.
Remember that the stacking kit, vertical clearance, and utility placement are just as important as the height of the units themselves. A well-planned installation ensures your laundry room remains functional, safe, and efficient for years to come.
Taking the time to measure your space accurately and account for all variables will provide peace of mind during the installation process. If you are ever in doubt, consult a professional plumber or appliance technician who can evaluate your specific utility room layout.
Proper planning ensures that your laundry setup works for your lifestyle rather than against it. When you are ready, verify your measurements twice, purchase the correct stacking hardware, and enjoy the convenience of a modern, space-saving laundry configuration.