How Much Space Behind a Washer and Dryer Is Needed for Hoses and Vents?
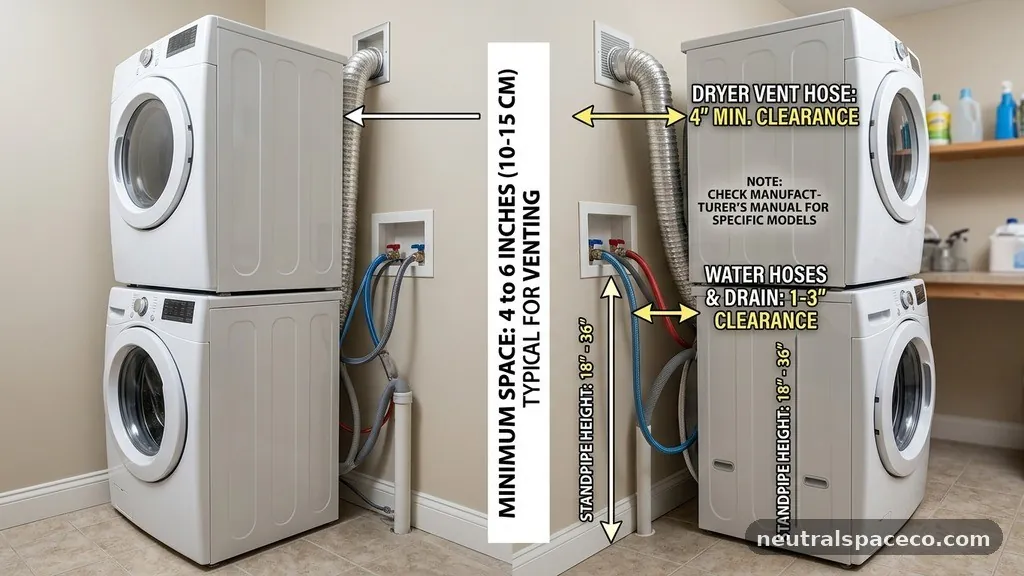
Determining how much space behind a washer and dryer is needed for hoses and vents is a common challenge for homeowners planning a laundry room renovation. Whether you are installing new units or optimizing an existing laundry closet, understanding these clearance requirements is vital for safety and machine performance. Most manufacturers recommend providing at least 4 to 6 inches of clearance between the back of your appliances and the wall.
This buffer allows for the necessary bends in flexible ducting and water lines without kinking or crushing them. By following these guidelines, you can protect your equipment from premature wear and ensure your home remains safe from fire hazards associated with restricted airflow.
The Minimum Clearance for Standard Installations
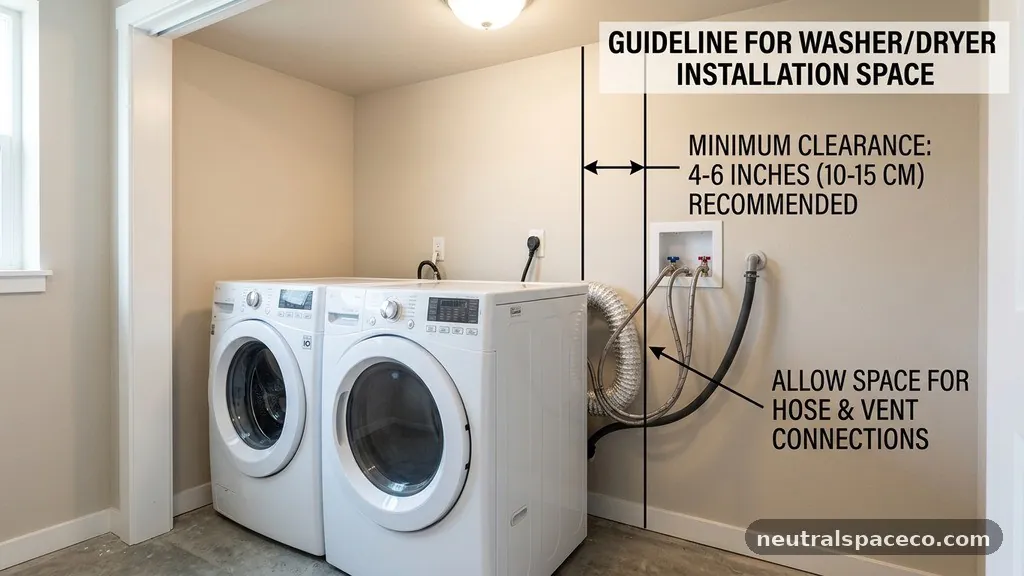
When calculating how much space behind a washer and dryer is needed for hoses and vents, you must account for the physical thickness of the connections. A standard dryer exhaust vent typically requires at least 4 inches of clearance to prevent the hose from becoming compressed against the wall.
If the hose is crushed or kinked, airflow is significantly restricted, which forces the dryer to work harder and increases the risk of lint buildup. Lint accumulation in a restricted vent is a leading cause of residential house fires, making this spacing requirement a critical safety matter.
Water supply hoses for washers also require specific attention regarding the distance between the unit and the wall. These hoses, often made of rubber or braided steel, need enough room to curve gracefully without being pinched by the heavy machine.
If you push the washer too close to the wall, the back panel may press against the hose fittings or the wall valves themselves. This pressure can lead to slow leaks or, in extreme cases, a sudden rupture that causes water damage to your flooring and walls.
Evaluating Dryer Venting Requirements
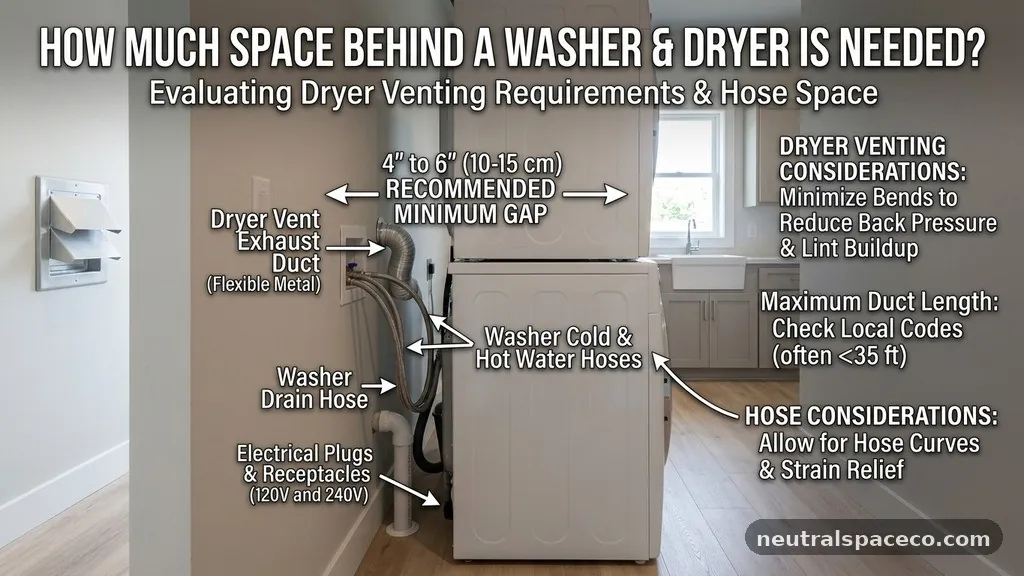
Dryer vents are arguably the most sensitive component when considering rear clearance. Unlike water lines, which are static, dryer vents must handle high-volume, hot, and moisture-laden air that carries lint particles.
If the vent hose makes a sharp 90-degree turn immediately behind the dryer, the efficiency of your appliance drops dramatically. Manufacturers often specify a maximum length for vent runs, and every sharp bend acts as a restriction that subtracts from that total length.
To maintain proper exhaust, you should aim for a smooth, gradual transition from the dryer outlet to the wall port. Utilizing specialized low-profile or periscope-style vents can help you reclaim a few inches of floor space if your laundry room is particularly tight.
These rigid, adjustable vents are designed to fit into narrow gaps, allowing you to push the dryer closer to the wall while maintaining a safe, unobstructed path for exhaust air. Always ensure the vent material is non-combustible and installed according to the National Fire Protection Association standards for home heating and venting.
Water Supply and Drain Considerations
Washers require two water supply lines and a drain hose, all of which occupy space behind the unit. The drain hose is usually the thickest component and often dictates how close you can safely place the washer to the wall.
Because this hose must gravity-drain into a standpipe, it cannot have sharp upward loops that would trap water and cause the machine to error out. You must ensure the hose has a clear, downward slope toward the drain box.
Supply valves for hot and cold water also protrude from the wall, adding to the total depth requirement. If these valves are located directly behind the washer, you might lose an additional 2 or 3 inches of space compared to a side-mounted configuration.
Investing in 90-degree elbow connectors for your water lines can save valuable inches, effectively redirecting the hoses sideways rather than straight out toward the back of the machine. This simple hardware swap is often the difference between a washer that protrudes into the hallway and one that sits flush with your cabinetry.
Comparing Space Needs for Different Appliance Types
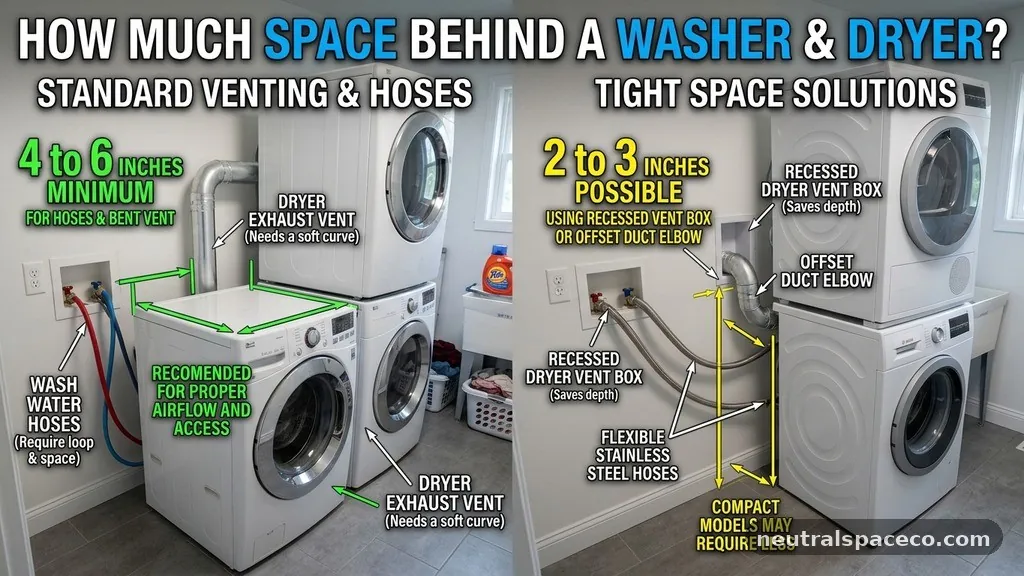
The requirements for space behind a washer and dryer can vary depending on whether you are using top-loading or front-loading models, as well as the specific design of the unit’s rear panel. Some modern washers have recessed backs that accommodate hoses and electrical cords, effectively allowing them to sit closer to the wall. Conversely, older models or high-capacity units may have flat backs that offer no such relief, requiring more external clearance.
| Component | Standard Clearance Needed | Impact of Insufficient Space |
|---|---|---|
| Dryer Vent | 4 to 6 inches | Fire hazard, longer dry times |
| Washer Hoses | 3 to 5 inches | Kinked lines, potential leaks |
| Electrical Cord | 2 inches | Damaged insulation, short circuits |
| Drain Hose | 4 inches | Drainage failure, error codes |
This table highlights why planning for a buffer of at least 4 inches is a universal best practice. While you might be able to squeeze a machine into a tighter gap, you are essentially betting against the durability of your plumbing and the safety of your ventilation system. Always err on the side of caution by providing the maximum recommended room.
The Role of Laundry Room Layouts
Your laundry room layout dictates how much flexibility you have with rear clearance. In a dedicated laundry room with plenty of floor space, pushing the units out by 6 inches is rarely an issue.
However, in closet-style installations or small utility rooms, every inch of depth is precious. You should measure your total available depth from the wall to the front door frame to see if your chosen appliances will fit comfortably.
If you are building a custom laundry area, consider recessing your water valves and electrical outlets into the wall itself. By using a recessed laundry box, you can move the appliances significantly closer to the wall without crushing the connections.
This strategy is particularly effective for front-loading washers, which are often deeper than their top-loading counterparts. When the valves are tucked inside the wall, you only need to account for the thickness of the hoses themselves rather than the protruding shut-off handles.
Safety Hazards of Cramped Installations
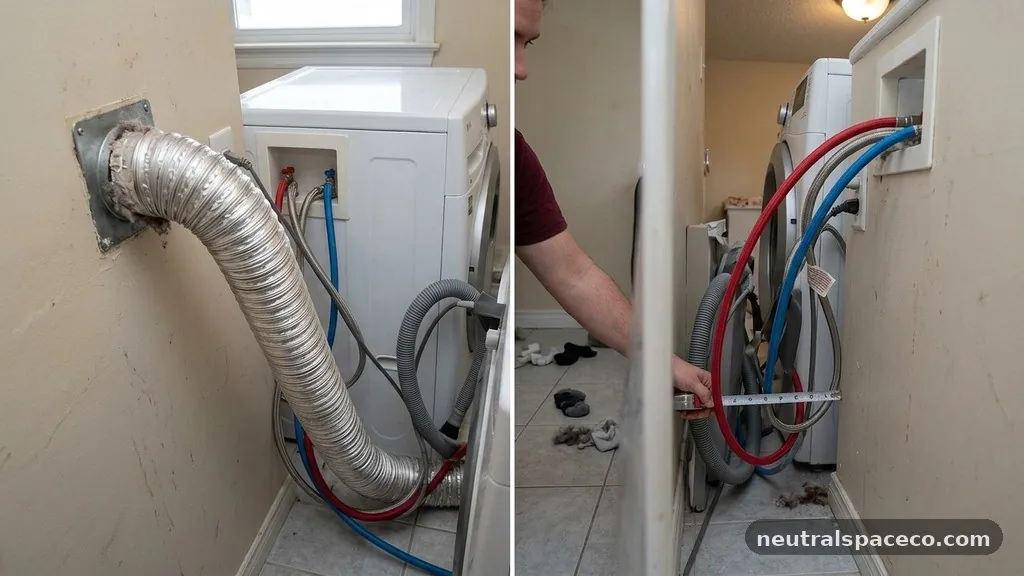
Ignoring the space requirement behind your washer and dryer leads to several preventable safety risks. The most immediate danger is a fire caused by lint buildup in a crushed dryer vent.
When airflow is blocked, the dryer heating element stays on longer, raising the temperature of the internal cabinet and the trapped lint to dangerous levels. This scenario is a frequent contributor to laundry room fires that could have been avoided with better ventilation.
Beyond fire safety, mechanical stress on your plumbing is a significant concern. When a washer is pushed against a wall with insufficient clearance, the vibration of the machine during the spin cycle can cause the back panel to repeatedly strike the hose connections.
Over time, this constant movement can loosen fittings or cause the rubber hoses to develop fatigue cracks. Water damage from a burst hose can be catastrophic, often going unnoticed until the subfloor is severely compromised.
Optimizing Connections for Tight Spaces
If you find yourself with very limited room, there are several hardware solutions to help you reclaim space. Flexible, crush-proof aluminum or stainless steel dryer vents are superior to the older, thin plastic accordion-style ducts that are prone to melting and tearing.
These robust materials maintain their shape even under pressure, which is essential when space is at a premium. Always use smooth-walled metal piping where possible, as it minimizes lint accumulation compared to flexible varieties.
For water lines, braided stainless steel supply hoses are the industry standard for durability and flexibility. Unlike traditional rubber hoses, which can stiffen and crack over time, braided steel is resistant to bursting and can be bent into tighter configurations without kinking.
Using these alongside angled adapters allows you to route your plumbing along the wall rather than straight into the back of the machine. This lateral routing can shave off several inches of required clearance, helping you achieve a cleaner, more professional installation.
Checklist for a Successful Installation
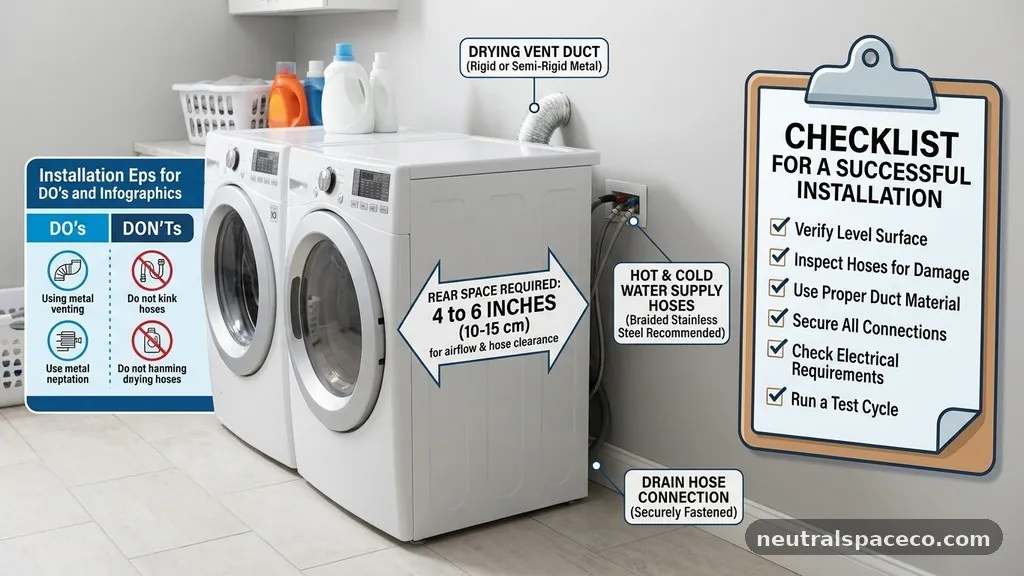
Before finalizing the placement of your appliances, run through a quick check of your setup. Ensuring everything is correctly positioned prevents the need to move heavy machines later. You want to confirm that all connections are secure and that the units are level, as an unlevel machine will vibrate excessively and increase the risk of hose detachment.
- Verify that the dryer vent hose is not crushed or kinked at the connection point.
- Ensure all water supply lines are free of tight, sharp bends.
- Confirm the washer drain hose has a clear path to the standpipe without being pushed against the wall.
- Check that electrical cords are not being pinched or pulled taut.
- Use a level to ensure both units are perfectly balanced on the floor.
- Test the machines on a short cycle before pushing them fully into their final position to check for leaks.
Following this list ensures that you aren’t just meeting the minimum spacing requirements, but also setting up your appliances for long-term reliability. A little extra time spent during the installation phase saves hours of troubleshooting and potential repair costs down the line.
Common Mistakes to Avoid
Many homeowners assume that if the machines fit in the space, the installation is correct. This is a dangerous assumption, as it ignores the critical need for air movement and access.
One of the most common errors is failing to provide enough room to reach behind the machines to disconnect them for future maintenance or in the event of an emergency. If you cannot reach the water valves or the power plug, you are effectively trapped if a leak or electrical fault occurs.
Another frequent mistake is using improper venting materials, such as vinyl or plastic ducts, which are highly flammable. Even with enough space, these materials are a liability because they can trap heat and degrade over time, leading to leaks in the exhaust path.
Always stick to rigid or semi-rigid metal venting that is rated for dryer use. Furthermore, avoid running your dryer vent through a crawl space or attic unless it is properly insulated and accessible for cleaning.
FAQ: Addressing Common Concerns
Stacking kits do not change the requirement for rear clearance. The hoses and vents still need the same 4 to 6 inches of space to function safely. While the footprint of the unit is smaller, the depth remains largely the same, so ensure you have sufficient room behind the stack.
Can a dryer vent go through a standard 2×4 wall?
Yes, it is possible to route a vent through a wall, but you must ensure you are not compromising the structural integrity of the studs. Use a rigid metal duct and seal the penetration point with fire-rated caulk. Check local building codes, as some jurisdictions have specific requirements for how vents must be supported within wall cavities.
Is it safe to use an elbow connector for the dryer vent?
Using a 90-degree elbow is often necessary in tight spaces, but it is not ideal for airflow. If you must use one, choose a smooth-walled, long-radius elbow rather than a sharp, short-radius one. This helps maintain the velocity of the exhaust air and reduces the surface area where lint can accumulate.
How often should I check the space behind my appliances?
You should inspect the area behind your washer and dryer at least once a year. Look for signs of moisture, check that the vent hose hasn’t shifted, and ensure that the connections are still tight. If you notice any unusual vibrations or sounds, check the clearance immediately.
What if my laundry room is simply too small for these clearances?
If your space is truly too small, consider using a ventless heat-pump dryer, which does not require an exhaust hose. For the washer, look for ultra-slim models that have side-mounted connections, which can significantly reduce the depth required for plumbing.
Conclusion
Understanding how much space behind a washer and dryer is needed for hoses and vents is essential for any homeowner. By providing at least 4 to 6 inches of clearance, you ensure that your dryer can exhaust safely, your washer can drain properly, and your connections remain free from damaging pressure. These small adjustments prevent significant hazards like fires, water leaks, and premature appliance failure.
Always prioritize safety over the aesthetic desire to have your machines sit perfectly flush against the wall. Taking the time to properly route your hoses and vents today will save you from costly repairs and safety concerns in the future. If you are unsure about your specific setup, consult your appliance manual for the manufacturer’s exact clearance specifications.